sábado, diciembre 22, 2007

(Continued)

6) Once the bezel is out, I removed the screws (8) that hold the panel.  This is a very easy step.

DSC03642

DSC03646 

7) After removing the 8 screws, the LCD panel is free.  I set up a cushion on the keyboard base and flipped the panel over.  The following picture shows the back of the LCD panel.

DSC03643

We can now disconnect the data bus from the inverter as it is shown in the figure. Note:  Use the pull tab to disconnect the inverter.

DSC03645 

8) Next I disconnected the data bus from the LCD panel. To disconnect press on both sides of the cable.  Note:  Be really careful not to touch any of the chips on the back side of the LCD panel.

DSC03644 

9) Once the all data buses have been disconnected, there is only one more cable connecting the inverter to the LCD panel.  I had problems disconnecting this because it has very hard and I did not want to break anything.  I finally decided to first remove the screw to free the inverter from the panel, and then with more freedom disconnect the cable.

DSC03734

10) Done!  Now I started assembling the laptop again. 

After replacing my inverter my screen is better than ever!  In the end I was lucky, plus I learned a lot solving the problem!


[MOD]

Etiquetas: , , ,

Summary

I bought a refurbished Dell Inspiron E1505. After a year and a month it started having problems with the screen. I had to change the inverter to fix the problem since the warranty was gone. I had never dissasembled a laptop myself. This is the story.

Identifying the problem

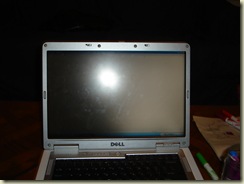
The screen slowly started to look like this:

DSC03635

After calling Dell, sending them the laptop to repair was out of the question. After googling up I found out the problem could either be a loose connector, the inverter or the backlight. The dell forums were very useful to figure out the problem.

I prayed for a loose connector, but It wasn't to be. I learned how to dissasemble my laptop checking dell support site.

I was left with the backlight or the inverter. There wasn't a way to know this, but to replace the backlight I had to replace the hole LCD screen (in this model the backlight is a chip in the LCD). Buying a new LCD in EBay would cost me around US$ 200. Buying an inverter would cost around US$ 40. Not every inverter works with my LCD so I had to check this before buying it.

Right before deciding what to do, the laptop started to make a buzzing noise and sometimes the screen would go completely black. Sometimes restarting the laptop plugged into an outlet solved the problem. I decided the inverter could be the problem.

Replacing the Inverter

I decided to buy the inverter in EBay, it would be the cheapest try. To dissasemble the laptop I only needed a phillips screwdriver. I had no previous experience dissasembling a laptop, but I had no choice.

DSC03743

Steps

I followed the steps suggested in Dell's documentation site.

1) The first thing to do is to remove the battery from the laptop.

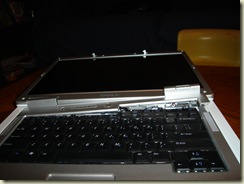
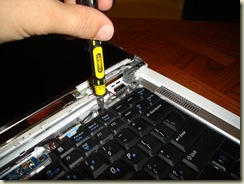
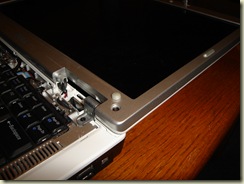
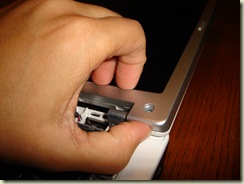
2) Next, remove the hinge cover (see picture), I did this leveraging the right side with my fingers and then lifting it carefully.

DSC03655

3) Once the hinge cover is out, I could access the keyboard screws. I'd recommend removing the keyboard since this allowed me to unplug every one of the screen connectors.

DSC03653

Once the screws are off (2), the keyboard can be removed. To me, this was the trickiest part. I did not know how hard to pull the keyboard, it took me some time to get the courage to pull hard. The keyboard must be lifted like shown in the picture below. Be really careful not to undock any of the keys, they are very very delicate.

DSC03650

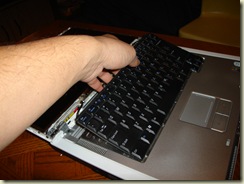
After lifting the keyboard, the data bus that must be disconnected. Removing the LCD cable that is underneath the keyboard allowed me to move the LCD freely afterwards. The wireless antena is also visible. The antena, which runs all the way to the top of the LCD cover should not be removed.

4) The next step is to remove the display bezel. I did not separate the display assembly from the laptop to do this.

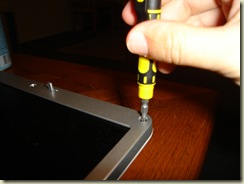
I started by removing the screw covers (6) like in the following picture

DSC03741

The, I removed each of the 6 screws.

DSC03738

5) After removing the screws, I separated the display bezel from the display back cover. This is explained in dell's documentation site.

The idea is: For each corner, i.e. the lower right corner, pull the bezel down to unlock the tab, then pull to the right to unlock another tab.

DSC03736

DSC03737

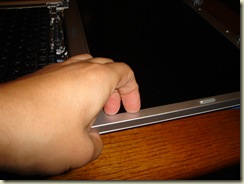
After removing the bezel, the panel is uncovered
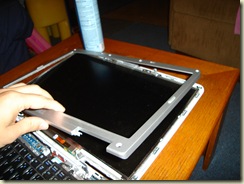
DSC03735

(continued)

Etiquetas: , , ,

lunes, febrero 19, 2007

Problems restoring using GBAK: Restoring computed columns using UDF:

There seems to be a problem and some related ones in the restauration of computed by columns in Firebird (1.X, 2.X?)

Aparentemente hay un problema y otros relacionados de orden en la restauracion de columnas computadas en Firebird (1.X 2.X ?).

The work around that worked for me is NOT to use the -o switch (-o[ne_at_a_time] ) of gbak. IBexpert has this option as "commit after each table". The thread in the sourceforge mailing list actually suggest using it, but I got the error WHEN using it!

La "trampita" que hay que hacer para que funcione es NO usar la opcion -o[ne_at_a_time] del gbak. En el IBExpert esta opcion aparece como "commit after each table". El mail en el mailing list de sourceforge sugiere usar la opcion, sin embargo yo tuve problemas al usarla!


IE:

Por ejemplo:

> gbak -r -c -v -z -user SYSDBA -pas XXX -y ..\..\backups\restore.log ..\..\backups\tape-backup.gbk "localhost :C:\Program Files\Firebird\data\TAPE-CENTRAL3.FDB"

gbak's -o restores one table at the time.
La opcion -o del gbak restaura secuencialmente todas las tablas.

The errors I had are:
En la primera prueba me dejo de los errores:

gbak: ERROR:action cancelled by trigger (0) to preserve data integrity
gbak: ERROR: could not find table/procedure for GRANT
gbak:Exiting before completion due to errors

and the infamous:

IBE: Invalid token.
invalid request BLR at offset 2.
function DZERO is not defined.
IBE: Restore completed. Current time: 6:40:28 PM. Elapsed time: 00:00:11

Etiquetas: , ,

jueves, julio 27, 2006

#Este es un ejemplo de como crear claves públicas y privadas para usar con un ssh
# y/o scp


# Primero tenemos que generar las claves privada y pública.
# Dejamos vacio el passphrase para que no nos pida en el momento hacer login


[aalliana@dharma aalliana]$ ssh-keygen -f .ssh/test1 -t rsa
Generating public/private rsa key pair.
Enter passphrase (empty for no passphrase):
Enter same passphrase again:
Your identification has been saved in .ssh/test1.
Your public key has been saved in .ssh/test1.pub.
The key fingerprint is:
bd:35:9e:01:d4:d6:f3:e1:6e:b5:5f:8b:c2:9f:86:95 aalliana@dharma

# Luego copiamos la clave pública a la máquina destino.

scp id_rsa_aalliana\@alicia.pub aalliana@alicia:/home/aalliana/.ssh


# Por último agregamos la clave generada al archivo de claves autorizadas.

[psanta@alicia .ssh]$ pwd
/home/aalliana/.ssh
[aalliana@alicia .ssh]$ cat id_rsa_aalliana\@alicia.pub >> authorized_keys2


# Con esto estamos listos para hacer el scp:

[aalliana@dharma bkp]$ scp -i ../.ssh/id_rsa_aalliana\@alicia aalliana@alicia:/home/aalliana/bkp/*.gz .

Etiquetas: , , ,

lunes, octubre 03, 2005

Mini How-to: Cómo instanciar un objeto usando java.lang.reflect:


En caso que el constructor de la clase no reciba parámetros, es más sencillo porque se no es necesario la clase Constructor, basta con el método newInstance de la clase Class.

Si el constructor de la clase recibe parámetros, tenemos que usar la clase Constructor.

Ejemplo:

String className = "py.com.roshka.wops.dataware.process.DatawareDistribuidores";
if (className != null && !"".equals(className)) {
Class cl = Class.forName(className);
System.out.println("class " + cl.getName());
Constructor c = cl.getDeclaredConstructor(new Class [] { Class.forName("py.com.roshka.db.DataBase"), Class.forName("py.com.roshka.db.DataBase")});

DatawareProcess p = (DatawareProcess) c.newInstance(new Object [] {srcDB, destDB});
processList.add(p);
}


aa

Links :
rgagnon
The Java Developers Almanac 1.4

Etiquetas:

miércoles, agosto 31, 2005

Modificar el "Mozilla Rich Text Editing" para que permita copy + paste

Setting Prefs for the Mozilla Rich Text Editing Demo

To protect users' private information, unprivileged scripts cannot invoke the Cut, Copy, and Paste commands in the Mozilla

rich text editor, so the corresponding buttons on the Mozilla Rich Text Editing demo page will not work. To enable these

functions for purposes of the demo, you must modify your browser preferences.

1. Quit Mozilla. If you have Quick Launch running (in Windows, an icon in the toolbar), quit that too.

2. Find your Mozilla profile directory. On Windows, this is often located in c://WINNT/Profiles//Application Data/Mozilla. (See also editing configuration files for more info on locating your profile folder.)

En mi caso es: C:\Documents and Settings\Alejandro\Datos de programa\Mozilla\Firefox\Profiles\4unkc087.default

3. Open the user.js file from that directory in a text editor. If there's no user.js file, create one.

Por default no existe, yo cree uno

4. Add these lines to user.js:

user_pref("capability.policy.policynames", "allowclipboard");
user_pref("capability.policy.allowclipboard.sites", "http://www.mozilla.org");
user_pref("capability.policy.allowclipboard.Clipboard.cutcopy", "allAccess");
user_pref("capability.policy.allowclipboard.Clipboard.paste", "allAccess");

Cambiar el url de la segunda linea por el url que corresponde, en mi caso: http://claroline.uc.edu.py

5. Save the file, and restart Mozilla. The Clipboard buttons should now function.

Etiquetas: ,

USO DE GBAK (INTERBASE / FIREBIRD)

# para backupear una base de datos interbase.
# -B(ACKUP_DATABASE) backup database to file
# -T(RANSPORTABLE) transportable backup -- data in XDR format
# -V(ERIFY) report each action taken
# -Z print version number
# -Y redirect/suppress status message output
# -C(REATE_DATABASE) create database from backup file
# -R(EPLACE_DATABASE) replace database from backup file


# Ejemplos:

# Hacer BK
rm /tmp/backup.log; gbak -b -t -v -user SYSDBA -pas xxx-y /tmp/backup.log localhost:/opt/interbase/data/tape-rk.gdb /tmp/tape-rk.gbk
gbak -b -t -v -user SYSDBA -pas xxx-y /tmp/backup.log localhost:/opt/interbase/data/tape116-5.gdb

/tmp/tape-backup-116-5.gbk

#verificar
cat /tmp/backup.log


# Restaurar BK
gbak -r -c -v -z -user SYSDBA -pas xxx -y /tmp/restore-preparar-lapatria.log /tmp/tape-backup-preparar-lapatria.gbk

localhost:/opt/interbase/data/tape114-1.gdb

#para reemplazar bd
gbak -r -c -v -z -user SYSDBA -pas xxxx -y /tmp/restore-116-5.log /tmp/tape-backup-116-5.gbk

localhost:/opt/interbase/data/tape-desarrollo.gdb

#para crear bd
rm /tmp/restore-116-5.log;
gbak -c -v -z -user SYSDBA -pas xxxx -y /tmp/restore-116-5.log /tmp/tape-rk.gbk localhost:/opt/interbase/data/tape-desarrollo.gdb

gbak -r -c -v -z -user SYSDBA -pas xxx -y /tmp/restaurar-toluca.log toluca.gbk

localhost:/opt/interbase/data/TOLUCA.TRAIDO.GDB

gbak -c -v toluca.gbk weallgodown.gdb

Additionally, there is a command-line tool gsplit that filters the
output of gbak and writes to multiple files on disk. This permits you
to back up a multifile database when the backup file is larger than
the operating system maximum.

Etiquetas: , ,